

GUIDING AGAINST BRAKE FAILURE
Managing Truck, Trailer and Load
Control your speed whether fully loaded or empty. Empty, large combination vehicles take longer to stop than fully loaded ones. A truck with a trailer is usually heavier, larger, and requires more driving skill than a truck by itself. Thus, drivers required to tow a trailer need more knowledge and skill than drivers of single vehicles. This additional skill and knowledge extends to the braking systems of the truck and the trailer. Safety and control of your vehicle is of primary concern. When lightly loaded, the very stiff suspension springs and strong brakes of a trailer give poor traction. The wheels lockup very easily and could make a trailer to swing out and strike other vehicles or jackknife.
Recognize the skid. The earliest and best way to see that the trailer has started to skid is to look in your mirrors. Any time you apply the brakes hard, check mirrors to be sure the trailer stays where it should. Once the trailer swings out of your lane, preventing a jackknife is very difficult.
Stop using the brake. Release the brakes to get traction back. Do not use the trailer hand brake (if you have one) to straighten out the rig. This is the wrong thing to do since the brakes on the trailer wheels caused the skid in the first place. Once the trailer wheels grip the road again, the trailer will start to follow the truck and straighten out.
When a vehicle goes around a corner, the rear wheels follow a different path than the front wheels. This is known as off-tracking or cheating. Off-tracking causes the path of a truck and trailer to be wider than the truck by itself. Longer vehicles will off-track more. The truck’s rear wheels will off-track some. The trailer’s rear wheels will off-track even more. Steer the front-end wide enough around a corner so the rear end does not run over the curb, pedestrians, or other vehicles. However, keep your vehicle’s rear near the curb to keep other drivers from passing you on the right. If you cannot turn without entering another traffic lane, turn wide as you complete the turn rather than swinging wide to the left before starting the turn. This will keep other drivers from passing you on the right. If drivers pass on the right, you might crash into them when you turn.
Preventing Loss of Air Pressure
Loss of air pressure in the emergency line activates the trailer emergency brakes. A trailer breaking loose, tearing apart the emergency air hose could cause the pressure loss. Or, a hose, tubing, or other part could break and let the air out. When the emergency line loses pressure, it also closes the tractor protection valve (air supply knob automatically pops out). Emergency lines are often coded red (red hose, red couplers, or other parts) to keep them from being confused with the blue or yellow service line.
Hose couplers are coupling devices that connect the service and emergency air lines from the truck or tractor to the trailer. The couplers have a rubber seal which prevents air from escaping. Clean the couplers and rubber seals before connecting them. When connecting the glad hands, press the two seals together with the couplers at a 90-degree angle to each other. A turn of the glad hand attached to the hose will join and lock the couplers in position.
Some vehicles have dead-end or dummy couplers to which the hoses maybe attached when they are not in use. This keeps water and dirt from entering the coupler and the air lines. Use the dummy couplers when the air lines are not connected to a trailer. If there are no dummy couplers, you can sometimes lock the glad hands together (depending on the couplings). You must keep the air supply clean.
When coupling, be sure to couple the proper glad hands together. Blue or yellow is used for the service lines and red for the emergency (supply) lines. Sometimes the lines have metal tags attached with service or emergency stamped on them. If you cross the air lines, supply air will be sent to the service line instead of charging the trailer air tanks. Air will not be available to release the trailer spring brakes (parking brakes). If the spring brakes do not release when you push the trailer air supply control, check the air line connections.
Older trailers do not have spring brakes. If the air supply in the trailer air tank has leaked away, you will not have emergency brakes. The trailer wheels will turn freely. If you crossed the air lines, you could drive but would not have trailer brakes. Always test the trailer brakes before driving. Use the hand valve or pull the air supply (tractor protection valve) control. Pull gently against them in a low gear to be sure the brakes work.
Air Brake System Inspection
The main reason for a proper Preventative Maintenance Check is safety. One of the most important components of a safe vehicle is a sound braking system. The Basic Seven-Step Inspection Procedure for inspecting vehicle comes in handy:
Step 1- Check the Vehicle’s General Condition.
Step 2- Check the Engine Compartment.
Step 3- Get in the Vehicle and Check the Gages and Controls.
Step 4- Turn Off the Engine and Check the Lights.
Step 5- Do a Walkaround Inspection.
Step 6- Check Signal Lights.
Step 7- Check the Brake System.
A vehicle with air brakes has more things to inspect than one without them.
During step 2 (engine compartment checks), check the air compressor drive belt (if the compressor is belt-driven). If the air compressor is belt-driven, check the condition and tightness of the belt. The belt should be in good condition.
During step 5 (walk-around inspection) do the following:
Check the manual slack adjusters on S-cam brakes. Park on level ground. Chock the wheels to keep the vehicle from moving. Disengage the parking brakes so you can move the slack adjusters. Use gloves and pull hard on each accessible slack adjuster. If a slack adjuster moves more than about one inch where the push rod attaches to it, it probably needs adjustment. Adjust it or have it adjusted. Brake lining wear over time causes slack to develop in your brakes. Vehicles with too much brake slack can be very hard to stop. Out-of-adjustment brakes are the most common problem found in roadside inspections. Be safe. Check the slack adjusters.
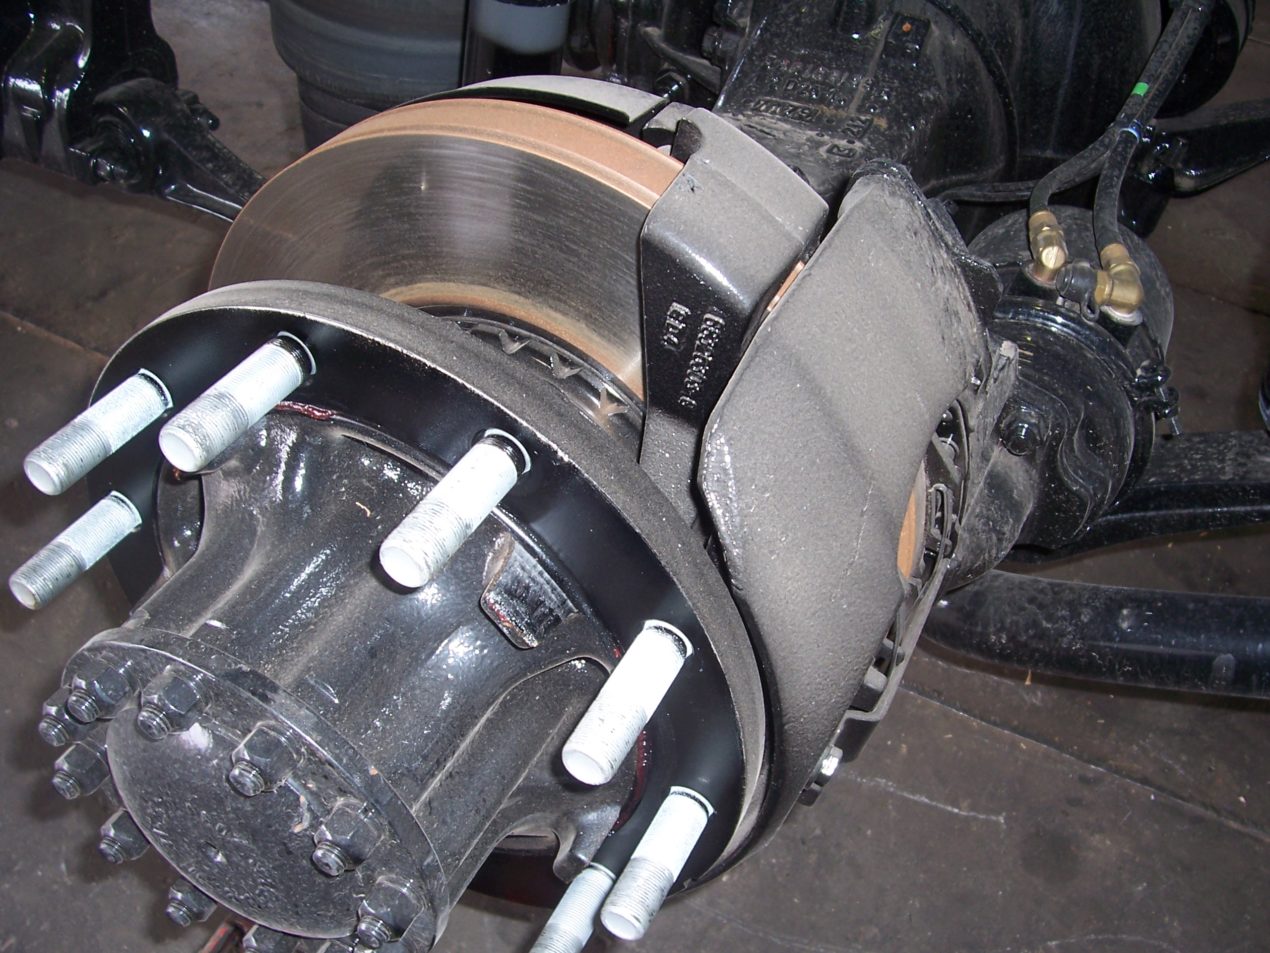
Check brake drums (or discs), linings, and hoses. Brake drums (or discs) must not have cracks longer than half the width of the friction area. Linings (friction material) must not be hose, soaked with oil or grease, or dangerously thin. Mechanical parts must be in place and not broken or missing. Check the air hoses connected to the brake chambers. Be sure they are not cut or worn.
For step 7 (brake system checks), check the following:
Test the low pressure wining signal. Shut the engine off when you have enough air pressure to inactivate the low pressure warning signal. Turn on the electrical power. Step on and off the brake pedal to reduce the air tank pressure. The low air pressure warning signal must come on before the pressure drops to less than 60 psi in the air tank (or the tank with the lowest air pressure in dual air systems). If the warning signal does not work, you could lose air pressure and not know it. This could cause sudden emergency braking in a single circuit air system. In dual systems, it will increase the stopping distance. Only limited braking can be done before the spring brakes are activated.
Check that the spring brakes come on automatically. Chock the wheels. Release the parking brakes when you have enough air pressure to do so. Shut off the engine. Step on and off the brake pedal to reduce the air tank pressure. The parking brake knob should pop out when the air pressure falls to the manufacturer’s specification (usually between 20 to 45 psi). This activates the spring brakes.
Check the air pressure buildup rate. With the engine at operating RPM, the pressure should build from 85 to 100 psi within 45 seconds in dual air systems. (If the vehicle has larger than minimum air tanks, the buildup time can be longer and still be safe. Check the manufacturer’s specifications.) In single air systems (pre-1975), typical requirements are pressure buildup from 50 to 90 psi within 3 minutes with the engine at an idle speed of 600 to 900 RPM. If the air pressure does not build up fast enough, the pressure may drop too low during driving. You may need an emergency stop. Do not drive until the problem is fixed.
Test the air leakage rate. With a fully charged air system (typically 125 psi), turn off the engine. Release the service brake. Time the air pressure drop. The loss rate should be less than 2 psi in one minute for single trucks and less than 3 psi in one minute for combination trucks. Then apply 90 psi or more with the brake pedal. After the initial pressure drop (which you do not count), if the air pressure falls more than 3 psi in one minute for single vehicles or more than 4 psi for combination vehicles, the air loss rate is too much. Check for air leaks. Fix them before you drive the vehicle. Otherwise, you could lose your brakes while driving.
Check the air compressor governor cut-in and cut-our pressure. The air compressor should start pumping about 100 psi and stop about 125 psi. Check the manufacturer’s specifications. Run the engine at a fast idle. The air governor should cut-out the air compressor about the manufacturer’s specified pressure. With the engine idling, step on and off the brake to reduce the air tank pressure. The compressor should cut-in about the manufacturer’s specified pressure. The pressure should start to rise. If the air governor does not work as described, it may need repair. A governor that does not work right may not keep enough air pressure for safe driving.
Test the parking brake. Stop the vehicle. Apply the parking brake. Gently pull against it in a low gear to test that it will hold.
Test the service brakes. Wait for normal air pressure and release the parking brake. Move the vehicle forward slowly (about 5 mph). Use the brake pedal to apply the brakes firmly. Note any pulling to one side, unusual feel, or delayed stopping action. This test may show you problems that you otherwise would not know about until you need to use the brakes.
CLICK HERE to read the Concluding Part!
The website is interesting! many thanks for sharing this beneficial info..
equipe de cote d ivoire
@Equipe de cote d’ivoire; Thanks for the compliment. We look forward to having more of your participation on this blog.